
C# Programming with Visual Studio Code
The C# Player’s Guide primarily focuses on Visual Studio Community Edition, but if you are on Linux or Mac, or just want a lightweight editor, Visual Studio Code is a great choice.
Visual Studio Code is more editor and less Integrated Development Environment (IDE). You will have to manually do more things on your own. But if you’re a more experienced programmer, you will not find it all that difficult. Even if you’re not very experienced, it isn’t too painful if you have some familiarity with running things from the command line.
Installing the .NET Core SDK and Visual Studio Code
You will need to install two things to be able to use Visual Studio Code to make C# programs.
The first thing to install is the .NET Software Development Kit (SDK): https://dotnet.microsoft.com/download.
Note: Be sure to get the SDK, not just the runtime, and also be sure to get the .NET one, and not the .NET Core or .NET Framework one. (You can get those, too, but you will need the main .NET SDK for this book.)
The second thing to install is Visual Studio Code itself: https://code.visualstudio.com/
The Terminal and Visual Studio Code
As you launch Visual Studio Code, there are two things you must know about it.
First, Visual Studio Code does fewer things than the full Visual Studio. This comes down to it being more editor than IDE. But it can still be used to do all of the things you would typically want to do when creating C# programs, even if some of them are a bit more difficult to do than it would be in Visual Studio. For example, we will need to use the command line to create new projects in Visual Studio Code, something that can be done through the user interface in the full Visual Studio.
The second is that Visual Studio Code is very barebones just after installation. It doesn’t even include basic C# editing capabilities at first. The upside is that Visual Studio Code has a robust extension system, and there is a C# extension available. We’ll deal with that in a moment.
Creating a New Project
Visual Studio Code does not have the ability to create a new project from the user interface. Instead, we must do that from the terminal.
Opening the Terminal
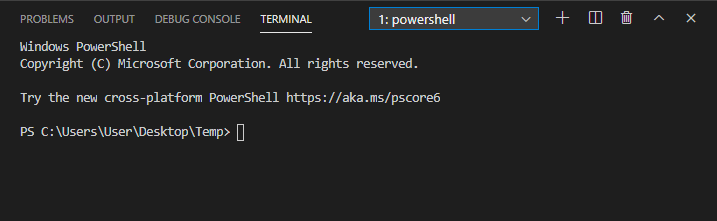
You can open up a terminal such as cmd.exe, PowerShell, or through any other tool that your operating system supports, but an easy alternative is to just use the Terminal window embedded in Visual Studio Code.
To open this window, go to either View > Terminal in the menu or use the Ctrl + ` keyboard shortcut. This will open the Terminal window, as shown below:
Verifying the .NET SDK
Let’s start by checking that the .NET SDK was correctly installed. To check this, go to the Terminal window and type in the command below:
dotnet
If this is working correctly, you should see output that looks something like this:
PS C:\Users\User\Desktop\Temp> dotnet

Usage: dotnet [options]
Usage: dotnet [path-to-application]

Options:
  -h|--help         Display help.
  --info            Display .NET Core information.
  --list-sdks       Display the installed SDKs.
  --list-runtimes   Display the installed runtimes.

path-to-application:
  The path to an application .dll file to execute.
If you get an error instead, then you need to go back and figure out what went wrong during the SDK’s installation process.
Change to the Right Location
The next step is to change the terminal’s working directory to wherever you want a new C# program to live. This can be anywhere you want, as long as you can find it later.
For example, I’m going to put my new program in a new folder inside my Documents directory. So I run the following command to get to Documents:
cd C:\Users\RB\Documents
Make a Directory for the New Project
We want our new program to be separated from other programs, so I’m going to create a subdirectory or folder inside of the Documents folder:
mkdir HelloWorld
Then I’m going to shift my working directory to be inside of this new folder:
cd HelloWorld
Create the Project
Next, you will use the SDK’s command line tool to create a new project from the console template with the following command:
dotnet new console
The dotnet tool is the .NET SDK, and is a starting point for running many programming related tasks.
The new option is used to make new projects from templates.
The console part indicates that we want to make a new console app, or that we want to use the template named console.
There are many other templates that exist that can be used in other situations.
Inspecting the Creation
You may find it interesting when you use a template for the first time to look around and see what got created.
For example, I used the ls command to view the directory and saw the following:
PS C:\Users\RB\Documents\HelloWorld> ls

    Directory: C:\Users\RB\Documents\HelloWorld

Mode                LastWriteTime         Length Name
----                -------------         ------ ----
d-----       10/15/2020   9:44 PM                obj
-a----       10/15/2020   9:44 PM            178 HelloWorld.csproj
-a----       10/15/2020   9:44 PM            192 Program.cs
Program.cs is our initial C# source code file, which we will soon be editing.
HelloWorld.csproj contains our project’s configuration.
The obj folder is called the “object” folder, and when our program is compiled, the compiler will put lots of stuff in there (as well as create other directories).
Adding the Project to Visual Studio Code
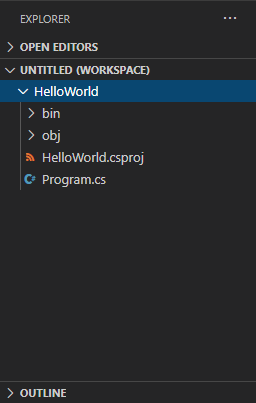
After the previous terminal commands, the project exists on our file system, but Visual Studio Code doesn’t know anything about it yet. We must add it to a workspace for it to show up.
The Explorer window on the left shows our current workspace, which starts empty:

Hit the Open Folder button to add the newly created project to your workspace.
Installing the C# Extension
Visual Studio Code is barebones at installation time. It cannot even work with C# projects very well, and you will need to install an extension.
Luckily, Visual Studio Code is smart enough to recognize that you’re working with a C# program and that the C# extension would be helpful.
After adding the project to the workspace, you will see the following notification appear in the bottom right of Visual Studio Code’s window:
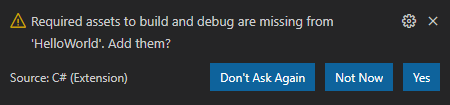
You can press the Yes button on that to install it.
The other way to install extensions is by going to View > Extensions or by pressing Ctrl+Shift+X. Search for “C#” and you will find it at the top of the list.
This view is also visible in the icon bar on the left edge of Visual Studio Code. It is the item that looks like four boxes, with the top right separated from the rest.
Once you are done changing extensions, you can get back to the Explorer view by clicking on the top icon, which looks like two overlaid sheets of paper.
Editing Code
In the Explorer view, you can double-click on a file to open it in the main editor view. Our programs will start in Program.cs, but in time, we will add other files to the list.
Running and Debugging Your Code
You can run your program by going to Run > Start Debugging on the menu, or pressing F5. Then pick the .NET Core environment from the list that appears. You will only have to pick this once, but doing so will cause a launch.json and a tasks.json file to show up in a .vscode folder in your workspace. This will compile and run your program.
If your code is broken when you attempt to run it, you will see a list of items show up in the Problems window instead of launching. You will need to figure out what each of the items in that list means and fix them before the program can run, though the book provides some pointers on how to approach solving compiler errors towards the back of the book.
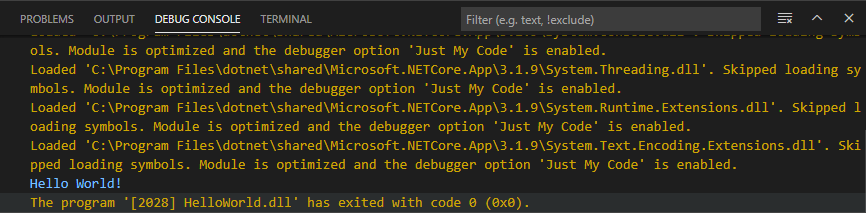
But if all goes well (and it should if you haven’t edited the code after creating it from the template) you will see your program run, with the output displayed in the Debug Console window.
Running with a Terminal to Get User Input
Somewhat awkwardly, the default option for running your program (using the internal console) does not allow the user to type in text in Visual Studio Code. Most programs we create in the book require being able to get this input from the user. This limitation is going to be a problem until we fix it.
Visual Studio Code has three options for a console. The default option is to use the internal console, which is what shows up in the Debug Console window. If we reconfigure our program to run under one of the other two options, we will be able to get input from the user.
This is configured inside of the launch.json file, so start by clicking on that file in the Explorer to open it in the editor. In that file, you should see a line that looks like this (on about line 15):
"console": "internalConsole",
You can change that "internalConsole" part to be either "integratedTerminal" or "externalTerminal".
If you use "integratedTerminal" then the output of your program will show up in the Terminal window instead of the Debug Console window, but it will also accept input.
If you use "externalTerminal" then when your program runs, it will open up a new window, outside of Visual Studio Code.
This last version is perhaps the most like how the full Visual Studio runs your programs, but either of the two will work.
Other Differences
As you go through the book, you will find ways that Visual Studio Code and the full Visual Studio are not quite the same. Most of the basics are the same or similar enough for you to find your way without too much trouble, but they are different programs, and that leads to differences in capabilities and behavior.
You will need to rely more often on your command line skills to get certain things done, and you will often rely on the dotnet tool to help you do certain activities, like we saw here with creating new projects.
If you do encounter some other big difference that doesn’t have a clear path forward, let me know so I can add it to this article or another article.